One of the unsung heroes of the home is a sump pump. It operates quietly in the crawl space or the basement and keeps your home dry, free of mold and damage to the foundation. Your sump pump should be serviced like any other piece of equipment, particularly the sump pump pit. Not only will cleaning the pit give your pump an efficient life, but it will also prevent unpleasant smells.
This guide simplifies the whole process into steps that can be followed easily. You may have never cleaned a sump pump pit in your life, or you may have just come here to refresh your memory.
Why Cleaning Your Sump Pump Pit Matters
Prevents Flooding
The pump or float switch can be clogged by a dirty pit, and so, during heavy rains it can stop working. Frequent cleaning ensures that everything is running well when you need it.
Extends the Life of Your Sump Pump
Pump components can be worn out with dirt, sludge, gravel, and debris. Cleaning the dirt accumulation will ensure the pump is able to operate easily, and it will have a longer life.
Reduces Odors
The presence of water with gunk and bacteria may produce a strong and unpleasant odor in the basement. Washing gets rid of this odor.
Helps You Spot Problems Early
During cleaning, you can find such problems as rust, cracks, or loose connections, and you can fix minor problems before they become expensive repairs.
How Often Should You Clean a Sump Pump Pit?
Most homeowners should clean their sump pump pit:
- Every 6-12 months based on usage
- Before heavy rainy seasons
- Following a significant storm or flood
If your pump is frequently used, it is located in a high-water table, or it has been clogging, cleaning it more frequently (after every 3-4 months) can be helpful.
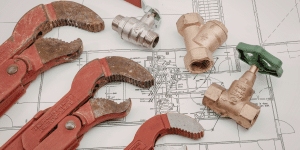
Tools and Materials You’ll Need
Have the appropriate supplies ready to make it fast and safe:
- Rubber gloves
- Work clothes or old clothing
- Wet/dry shop vacuum
- Large bucket
- Plastic scraper or garden trowel
- Flashlight
- Light detergent or bleach solution
- Cleaning brush or sponge/small
- Screwdriver (unless you have to dismantle your pump)
- Clean water for rinsing
- Towels or rags
Step-by-Step Guide to Cleaning a Sump Pump Pit
Step 1: Disconnect Power to the Pump
- Safety always comes first.
- Disconnect the sump pump from the electricity.
- When it is hardwired (not so common in the U.S. homes), switch off the breaker of the pump.
- Never carry out any work on a sump pump when it is in power.
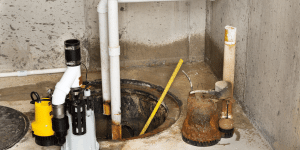
Step 2: Remove the Sump Pump from the Pit
Gently remove the pump out of the pit. Keep in mind:
- Pumps may be heavy due to water and debris.
- Put it on plastic sheets, cardboard, or old towels to avoid damaging floors.
- Allow the pump to run off for a few minutes.
Step 3: Remove Standing Water from the Pit
- Use a wet/dry vacuum to dry up the remaining water in the pit.
- Be careful of the bottom in case there is gravel or sand.
Step 4: Scoop Out Sludge and Debris
With a plastic scraper, a garden trowel, or with your gloved hands:
- Eliminate mud, sludge, gravel, etc.
- Put in a bucket to be disposed.
This is the most significant measure towards preventing future blockages.
Step 5: Scrub the Inside of the Pit
Work with a brush or a sponge and some detergent or a bleach solution (1 cup bleach + 1 gallon water).
Wipe the sides and the base of the pit to remove:
- Mold
- Mineral deposits
- Built-up grime
When you have a plastic pit (which is common in houses today), don’t use harsh chemicals that may destroy the material.
Step 6: Rinse and Vacuum Again
After scrubbing:
- Add clean water to the sides of the pit.
- Clean the dirty rinse water using wet/dry vacuum.
- Continue this until the water that you take off is reasonably clear.
Step 7: Inspect the Pump and Pit Components
While everything is apart, take a moment to check:
Float Switch
- Does it move freely?
- Is it not obstructed?
- Are there no signs of damage?
Power Cord
- No fraying
- No exposed wires
- Tight connection to the pump
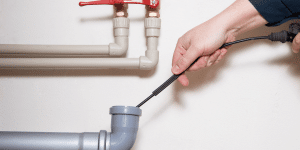
Discharge Pipe
- Clear of clogs
- Secure fittings
- No cracks or leaks
Check Valve
- This valve is a one-way outlet to ensure that the water does not move back to the pit.
- Shake it–you may have to replace it, if you hear water sloshing.
- Ensure that it is closely attached.
Step 8: Reinstall the Sump Pump
Carefully put the pump back in the pit.
Make sure:
- The pump sits flat and level
- The float switch is free-floating
- The discharge hose is once again fitted back
Step 9: Test the Pump
Before calling it done:
- Plug the pump back in
- Add some gallons of water to the pit
Monitor to be sure that the pump:
- Turns on automatically
- Works at a standard rate
- Switches off after emptying the pit
If anything appears abnormal—it’s making strange sounds, or it’s slow functioning, etc—then it might be time to perform maintenance.
Additional Tips for Maintaining a Clean Sump Pump Pit
- Install a pit cover to minimize debris
- Check every three months
- Clean the space around the pit and ensure that it has no clutter
- Check your pump during power outages
- Have a backup battery system or a backup pump
When to Call a Professional
There are some cases that require the assistance of an expert, including:
- Sustained Odors despite the cleaning
- Repeated pump failures
- Electrical issues or sparks
- Any pump that is over 7-10 years old and presents indications of wear
- Pit flooding that won’t drain
A certified plumber or a specialist in basement waterproofing can find out what is wrong within a short period of time.